1. REMOVE CLUTCH COVER

2. REMOVE STOCK SPRINGS

 3. Pull push rod and stock pressure plate away from clutch housing.

 4. Remove stock pressure plate, it will pull off with some force and separate with the bearing/ push pin attached to the stock pressure plate.
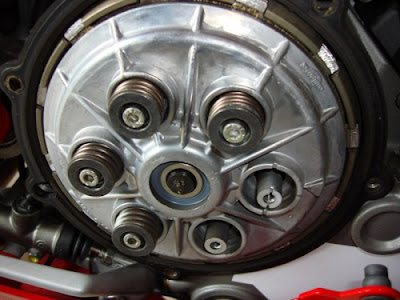
 5. Notice the o-ring inside the stock push pin. The STM replacement push pin do not have an o-ring. At any rate it's ok not use one when installing the STM replacement. Same goes for other brands


6. Notice the Notch
This notch must be lined up with the mark on the pressure plate when installing the new one.

7. Notice the small dot on the most bottom fin of the pressure plate


8. Spring compare picture, stock is left and right is the new stainless steel spring. Same thing with the bolts

9. I installed all the springs and caps just to hold the plate in place and then I tighten them all up in a star pattern all the way down adding a snug turn at the end. DO NOT OVER TIGHT!!!

10. Ready to GO :)

 3. Pull push rod and stock pressure plate away from clutch housing.
 4. Remove stock pressure plate, it will pull off with some force and separate with the bearing/ push pin attached to the stock pressure plate.
 5. Notice the o-ring inside the stock push pin. The STM replacement push pin do not have an o-ring. At any rate it's ok not use one when installing the STM replacement. Same goes for other brands

6. Notice the Notch
This notch must be lined up with the mark on the pressure plate when installing the new one.

7. Notice the small dot on the most bottom fin of the pressure plate


8. Spring compare picture, stock is left and right is the new stainless steel spring. Same thing with the bolts

9. I installed all the springs and caps just to hold the plate in place and then I tighten them all up in a star pattern all the way down adding a snug turn at the end. DO NOT OVER TIGHT!!!

10. Ready to GO :)

2 comments:
why does the notch and the mark have to be lined up?
Also, the last picture at comment 10 says 'ready to go', but there is no cover over the pressure plate!
@Jonny748: Ready to go meaning that the pressure plate is good to go since the title is 10 easy steps to install a pressure plate. But of course we don't ride our without the clutch cover although I've seen DUCATIS being ridden without the cover. As for the notch, I think it has to be lined up correctly with regards to the tooth/gears from both plate and clutch, at least for the STM brand
Post a Comment